Sunday, December 13, 2015

Copper (II) Chloride and Iron Lab day 2

WOW!!!! Over night the reaction went wild!! There was this creepy weird orange stuff that looked like coral or something that you would find in the ocean on a reef! It grew on the nail!!! It looked pretty disgusting in all honesty! All of that stuff that grew on the nail was the copper! We had to take forceps to grip the nail and take water to get that product off the nail. Now the tedious part came! We had to siphon (suck up all the liquid) the solution the copper was in making sure to not suck up any product off. Then we had to add 25mL of HCl and siphon that off too. Then we had to add 25mL of water and siphon that off as well. The part that I probably scared me the most was worrying about if I sucked up any product! I wanted to make sure our results were as pure as they could get! So siphoning off three times made me feel like I was some surgeon operating on a heart! Now we just have to wait and let it dry!

Here are some pictures of the lab on day 2 below!

Copper (II) Chloride and Iron Lab day 1

This lab is overall pretty amazing! We first had to take the mass of the baby food jar and add copper (II) chloride in it. The powder was a pretty blue with sparkles. Then we added water in the jar, and we had to stir it with a stirring rod. Then we added the polished iron nail into the solution. Immediately we saw a reaction! The nail looked like it was being heated up because it looked like a yellow/orange kinda color that metal looks like when you're melting it. Then we just had to let it sit and wait for the reaction to finalize over night!

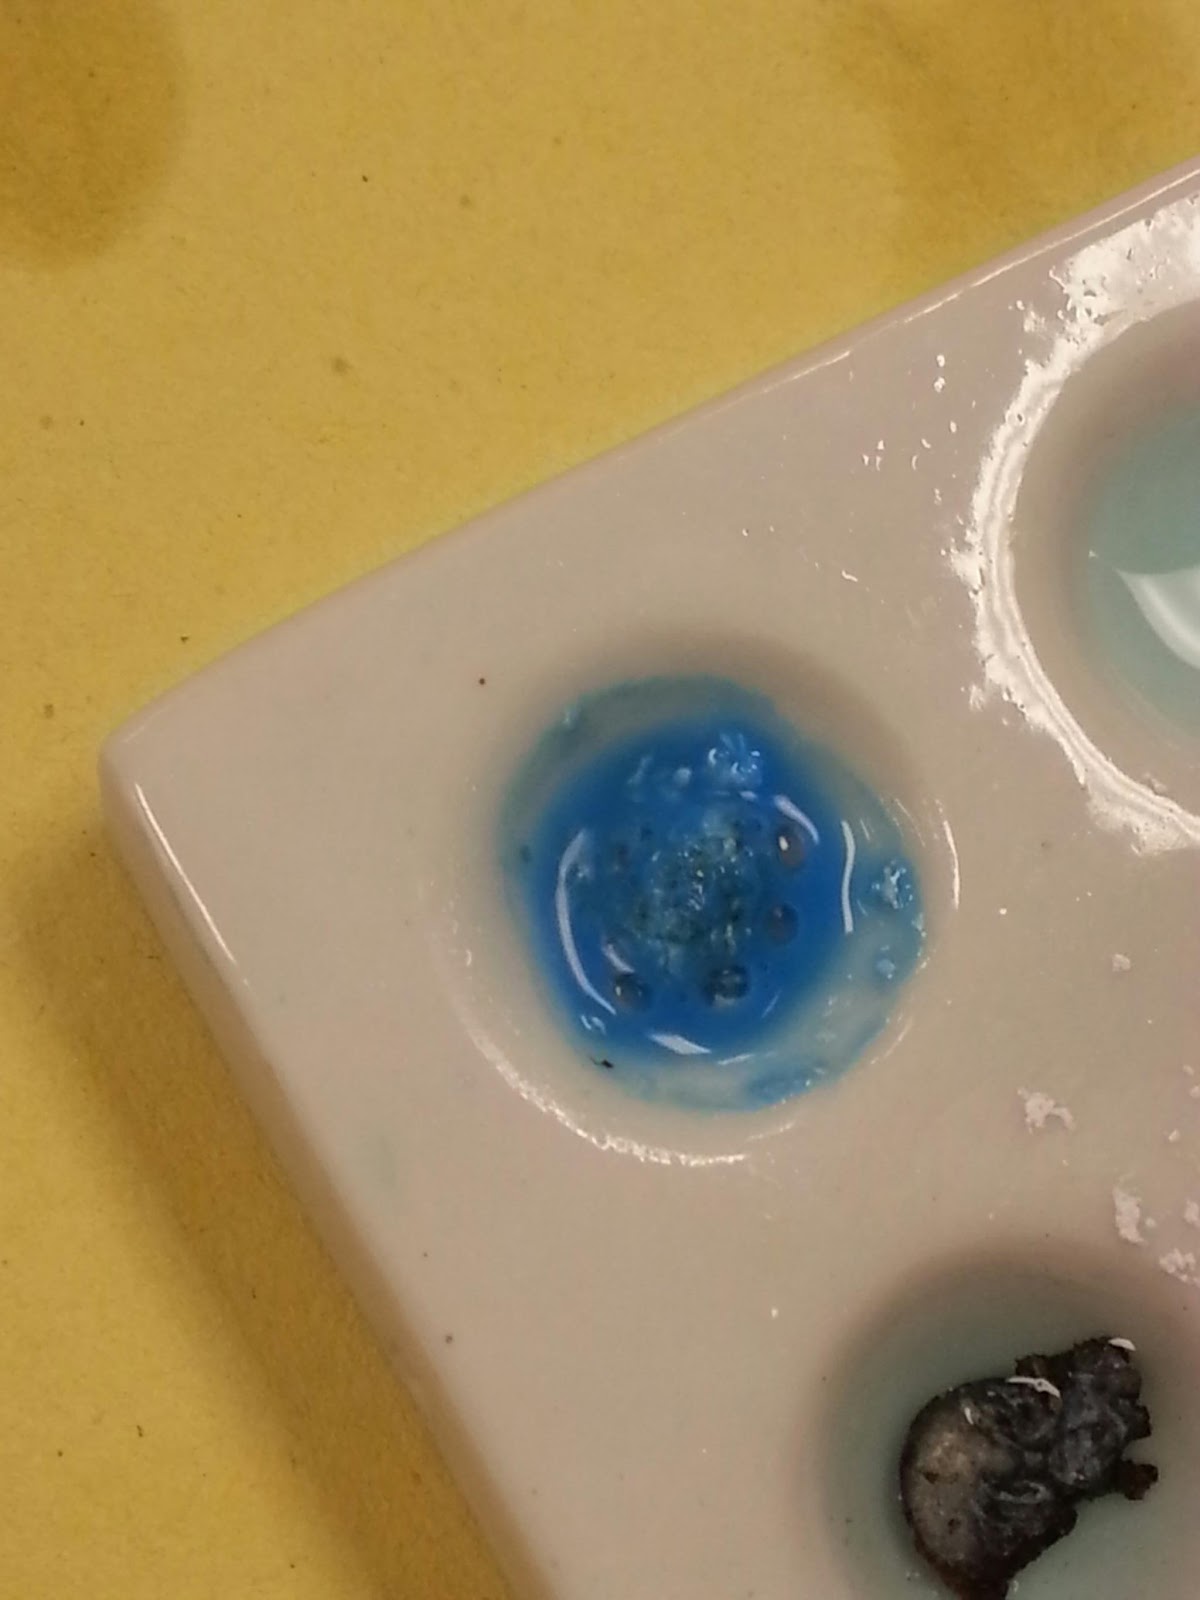
Here are some pictures below of the lab on day 1!

Wednesday, December 9, 2015

Weekly Quiz #1 for Stoichiometry

I made sure to do lots of practice questions in the multiple packets I printed off for this unit. In summary for Stoichiometry you basically find the limiting reagent and excess reagent. To do that you must take 2 elements/compounds with their given mass in grams. You must convert it both to moles in separate equations and then multiply that by the number of moles (coefficients!!!) for the element/compound you are trying to find and the number of moles of the element you are working on on the bottom of the fraction. Then you multiply that by the molar mass of the element/compound you are trying to find and put that over 1 mole. Once that is done, you look at which element/compound that produced the least amount of whatever element/compound that you're trying to find. The least one is your limiting reagent because that element/compound will run out first and limit the amount you can make in the other element/compound that you found. That will be your answer! :)

In the excess one (the element that produced the most amount of the element/compound), you basically do the same thing. However you take the limiting reagent amount (smallest number you found above) and convert that to moles. Then you multiply it by the molar fraction with the moles of the excess reagent on top and the moles of the element/compound that you were solving for on the bottom. Then you multiply that by the molar mass of the excess reagent. Finally you take the starting mass of the excess reagent subtracted by the number you just found. VOILA! You are now an expert! :)

Helpful links below!
STOICHIOMETRY - Limiting Reactant & Excess Reactant Video
Introduction to Limiting Reactant and Excess Reactant
Finding Limiting Reagent

Stoichiometry....what is it?!

The definition of Stoichiometry is the relationship between the relative quantities of substances taking part in a reaction or forming a compound, typically a ratio of whole integers. 

When I first saw this word on the board I couldn't even formulate a way to pronounce this! However, the first day of learning this was actually pretty good! It wasn't too confusing, for all it really involves are the atomic numbers, moles, and grams! Pretty basic! Plus Mrs. Frankenberg did a great job of explaining lots of examples on the board to help us memorize the process! I kinda love the beginning of this unit because it's pretty easy and doesn't require deep thinking that you would have to do in English! I think my favorite part of this is that the moles are just the coefficients of the reactant or product!! Super easy! 

Some helpful links below! 
What is Stoichimoetry?
Stoichiometry
Stoichiometry examples


Wednesday, December 2, 2015

Night Before Exam

It's December 2 and today is my birthday. I'm spending over half of my night studying for this test.  I'm studying every study material I have. I'm practicing every problem. I'm looking at videos and rereading all of my notes. I'm just trying every possible thing to do in order to study. Net Ionic equations for double replacement is super easy and I feel good about it because you just switch cations with anions. However net ionic equations for everything else just confuse me a little bit. Synthesis, decomp, single replacement, and combustion are redox reactions, for you need to use the oxidation rules. If there are two nonmetals then you have to look at the periodic table to see whos is on top of each other and the element on top is stronger than the element on the bottom. Acid and Base always produce water. A strong base are group 1 and 2 elements on the periodic table.  A strong base has 2 or more oxygen's outweighing the hydrogen's. Also HBr and HCl are strong acids. Strong base/acids break apart in reactions completely. Today I did a rundown with all the rules that apply to every type of equation. I just hope all of my efforts pay off tomorrow!!!!!

Tuesday, December 1, 2015

Redox Lab

Today we did a REALLY cool lab! We put all of these metals into this little plate thing and put different solutions to mix with it! I think my favorite one was the calcium and copper (II) sulfate one! The reaction started bubbling then all of a sudden smoke started coming out from it and it was sizzling! How cool?! It then turned into a blue solid. After it cooled it started to expand a little to where we could see the inisde. What was really cool was that it was blue on the outside and a perfect snow white color on the inside! Another reaction happened simular to this but it was a brown solid but it didn't expand and crack like the blue one. Did anyone have a favorite reaction in the lab?

Sunday, November 29, 2015

QUIZ!!!


When we took that quiz on Nov. 23 I was stressing out. I had a quiz in chem 1st hour, midterm 2nd hour and test in trig 4th hour. I did ALL of the extra practice in packets that are in schoology. After all of that I felt confident about the quiz. All of my hard work was put to use because I got a great grade on the quiz!!! Now if only I can do that on my test!! I feel like the first sections we talked about are pretty basic and it's honestly not too bad! It's just basically switching cations with the other anion! Plus adding the solubility rules which are pretty easy to remember. You just use those rules to see if a solid was produced from the reaction (switching cations with anions). An example of a solid is AgCl. An example of a non solid is CaCl. 

Helpful Links Below!

Double Replacement


AB(aq) + CD(aq)   --> AD(s) + CB(aq)

Above is an example of a Double Replacement reaction. I thought these were confusing at first but after a TONS of practice I got a handle on it! We did a lab on it! We had to take 2 solutions and mix them together. If they didn't turn a color then no solid was produced. To me the lab was super fun! There were some reactions though that didn't follow the solubility rules. But I would say for the most part the solutions followed the rules!

Solubility Rules


So at first I was very confused about the rules. I had to look at the piece of paper to remember the rules! In all honesty I thought I wouldn't be able to remember everything with all the exceptions and stuff! But I found it helpful to color the periodic table in 2 colors. One color representing the soluble elements and one representing the insoluble elements. It helped me visualize it much better. Then I made flashcards of the rules which helped me a lot too! I also found a video with acronyms to help as well! Check it out below!

Solubility Tricks Video

Rules Explained

Friday, November 13, 2015

Cooking is a science!

11/13/15

My foods teacher in 7th hour always says that cooking is a science. When you think about it, it's actually true! When you're baking cookies, you need precise measurements of a substance otherwise the taste of the food will turn out terrible and disgusting. In science you need precise measurements for your experiments otherwise things could explode if you have too much or too little of something. In cooking, you have these measurements that are mixed together in a mixture. Then you will cook/bake the mixture. This allows the substances in the mixture to bind their chemical composition together. In chemistry, you use heat to bind the mixture's chemical composition. Cooking and chemistry have many similarities than anyone would think of!

Thursday, November 12, 2015

The Headache Lab

11/12/15

So today we did the Formula of a Chloride Lab. The prelab was a breeze and thankfully my lab partner got the answer too so we could do the lab. All in all, I thought this lab was fun! However when we were heating the liquid away (hydrochloric acid), it gave me a nasty headache. Not to mention 98% of the class was also doing the lab so the aroma of the acid was VERY strong! When we finished the lab and went to the bathroom to wash our hands, I felt such a relief to have clean air. I really didn't want to go back to the classroom. I wasn't even putting my nose over the compound to smell it, for it was just sitting in the air. I learned a lot in that lab and got some personal experience on how Zinc and hydrochloric acid react with each other. It was kinda funny to see the Zinc dancing around on the bottom of the beaker because of how hot it was.


I know these are a lot of links all at once but hopefully this will appeal to different types of people in how they perceive things! I love all of these links and I think it will help! Extra practice helps!!! 


Quiz Galore

11/12/15

 I thought I did really good on it with two questions I wasn't sure about. However I guess I messed up on my calculations and I didn't get a good grade. I think the problem I have the most with problems is how to start them, Once I figure that out then it's easy from there. Also another thing I have trouble with is trying to understand what the problem is saying. Sometimes the problem to me is just too wordy and it gets all confusing to me. I studied a LOT for that quiz. I was up all night looking at my notes, solving different types of problems, looking through the study guides in the packet, etc. Hopefully I will do better on the next quiz or test. But at least I will learn from my mistakes so on the next quiz or test I'll know exactly what not to do and what I should do on these types of problems! :) But what I found helpful is to circle the given information and circle again what it is trying to ask. This helped when I went back through my quiz to do corrections!

Monday, November 9, 2015

Hydrated Compounds.....HOW DO YOU SOLVE THEM!? I got the answer!!

11/9/15

Many of us are confused on how to solve these type of questions and frankly I was too! It takes a little brain power and practice to solve it!

Suppose a student does an experiment to determine the formula of the hydrate: Cr(NO3)3 x nH2O

Mass of Test Tube: 16.114g
Mass of Test Tube +  Cr(NO3)3 x nH2O: 34.909g
Mass of Test Tube  +  Cr(NO3)3 x nH2O (1st heating): 27.335g
Mass of Test Tube  +  Cr(NO3)3 x nH2O (2nd heating): 27.335g 

Find n.

Now where the heck to we start?!?!

First of all what is the hydrated compound? Well it's the compound with the water added to it!! Hence hydrated. It's Cr(NO3)3 x nH2O. 

Second of all what is the anhydrated compound? It's the compound without the water. Hence ANhydrated. It's Cr(NO3)3. It's also known as the salt.

So we have a test tube that weighs 16.114g. Is this mass part of the compound? NO!! So we must subtract it from any compound to get the mass of what is inside of it!

That will give us 39.909g - 16.114g = 18.795 g of the hydrated compound

Then we want to figure out the mass of the anhydrated compound (without the water).
So we must take the last mass of the last heating which is 27.335g. But WAIT!!!!! You have to remember to subtract the mass of the test tube which is 16.114g. 

That will give us 27.335-16.114g = 11.221g of the anhydrated compound. 

So we know the mass of the hydrated compound (with water) and the mass of the anhydrated compound (without water), so next we need to figure out what mass of water was driven off/evaporated. That means we need to subtract the hydrated mass from the anhydrated to give us the mass of the water.

That will give us 18.795g - 11.221g = 7.574g of H2O

Now we need to convert the H2O and anhydrated into moles.

7.574g H2O x (1mol / 18.02 molar mass) = 0.4203 g (KEEP IN MIND OF SIG FIGS!!!!!)

11.221 g Cr(NO3)3 x (1mol / 238.03 molar mass) = 0.047141 g (KEEP IN MIND OF SIG FIGS!!!!!)

A little trick to know is that is the anhydrate is supposed to be smaller than the water!
0.047141 g is smaller than 0.4203g.

The last step is to divide by the anhydrate. 

0.047141 g / 0.047141 g =


0.4203g / 0.047141 g = 8.916 (KEEP IN MIND OF SIG FIGS!!!!!)

n8.916


Hope that helped!!!


Sunday, October 25, 2015

Mole Day!!!

10/25/15 

Friday, October 23, 2015, was Mole day! The measurement mole is 6.02214179 × 10 23

We all had to make an animal mole! I decided to make a cow mole! It was Moley Cow (Holy Cow)!!! I brought in pretzels for everyone! The party was super fun! Everyone's moles from other classes looked amazing!! There was a Mole (Poll) Stripper, GuacaMoley, SesaMole Street, a Party AniMole, Whack A Mole, and more! I thought everyone did an awesome job at being creative with theirs! HAPPY MOLE DAY!!! 


Measurement Unit Part 2

10/24/15

In this lesson I understood pretty well because I read the section in the book the night before. We talked about accuracy and how that is the proximity of a measurement to the true value of a quantity. However precision is different by that it's the proximity of several measurements to each other. Think of it as a dart board with the red bulls eye in the middle of it. Accuracy would be throwing one dart and either hitting super close to the bulls eye or hitting the bulls eye. Precision is throwing 5 darts and hitting the bulls eye each single time. 

We also talked about scientific notation. If it had a negative exponent we would move the decimal to the left, but it the number had a positive exponent, you would move the decimal to the right. An example is 0.0803 which would turn into 8.03 x 10(-2 exponent). 3.45 x 10(6 exponent) would turn into 3,450,000. 

Significant figures refers to digits that were measured. It's important to know you can estimate 1 digit past the calibrated number!!! Ex. If it was 1.23 you can measure to 1.22 or 1.24 but not to 1.21 or 1.25.

So what zeros counts and don't count as a significant number? Well I'm glad you asked! 


Significant numbers and zeros practice!
13 = 2 sf and 0 zs
0.01040 = 4 sf and 2 zs
90 = 1 sf
90.0 = 3 sf


Adding/Subtracting SF:
The rule is you must use the number with the smallest number of decimal places as the limiting term
for rounding. Ex. 4.60 + 3 = 8.6 but 3 has zeros decimal places (limiting term) so it becomes 8

Multiplication and Dividing SF:
The rule is you must use the number with the smallest number of significant figures. 
Ex. 2.5 x 0.568 = 1.42 but 2.5 has 2 significant figures while 0.568 has 3. So 1.42 rounds to 1.4. 

Measurement conversions!!! 

King                         Kilo = 1,00
Hector                      Hecto = 100
Died                         Deka = 10
Drinking                  Deci = 0.1
Chocolate                Centi = 0.01
Milk                         Milli = 0.001
                                 Micro = 1x10⁶    
                                        Nano = 1x10⁹               
                                               
         Pico = 1x10¹²                         

Measurement Unit Part 1

10/25/15

So I totally understand matter and how energy transfers from solid to liquid to gas. It's basic science. But I did struggle with the difference between homogeneous and pure mixtures. To me it feels like the same thing. Then when we moved on to physical and chemical properties, I totally understood. Physical is when it can be observed without changing a substance into another substance. An example is it's boiling temperature. It's the same substance but in a different form of matter. Chemical is when it can only be observed when a substance is changed into another substance. An example is when metal rusts because there is a chemical reaction taking place. A physical change is a change that does not change the composition of a substance (ex. change of state). Chemical change are changes that result in a new substance. Filtration is just separating solids from liquids. Exactly what we did with the aspirin! Distillation uses differences in the boiling points of substances. Chromatography is based on the polarity of a substance. I'm still confused on distillation and chromatography though!

Helpful links down below!
Distillation
Chromatography
Filtration

Wednesday, October 7, 2015

Is it snowing? Because I see crystals!!!!

10/7/15

On Monday we had extra time so we had already cut out the filter paper needed for day 2 of the Aspirin lab. So we grabbed it from the folder we kept it safely stored in and headed back to the lab stations. My lab partner and I were extremely happy that our Aspirin turned out amazingly good!! It wasn't fluffy like the other ones around ours (which is good!!). Ours had beautiful hard crystals! So we set up the lab for the day 2 part as we should, and we got every bit of the Aspirin out of the beaker onto the filter paper. The Buchner funnel helped us separate the liquid from the crystals. The most tedious part of the lab though was picking up the filter paper from the inside of the funnel onto the watch glass. That part was my job. I didn't want the paper to tear while I was pulling it out, and I didn't want to spill or knock off any Aspirin that we made. In the end, I was practically a surgeon with her PhD! I took it out so carefully and smoothly! I didn't even tear the paper or spill any Aspirin! I was super proud of myself and the teamwork between me and my partner! We did the lab as successfully as we could! We were careful and precise about anything and everything! I can't wait how it turns out when it has dried out for all fall break!


Cooking in Chemistry!

10/7/15

Monday was the day that held our future in Chemistry. We were making Aspirin from scratch. This Aspirin would be what we use for the rest of the year for future labs. Monday was a quite stressful morning since we had to pass the pre-lab quiz in order to do the lab. Lots of pressure. On Sunday night and Monday morning I was cramming as much information about the procedure and safety as I possibly could. This lab held our future and our grades, for it was the most important lab of the year. In the end, me and my partner both passed the quiz!! We were pretty happy!!! Once we  got our goggles on, we had went to the back of the room. I set up everything while my partner got the 5g of salicylic acid powder. We did our separate rolls and everything went smoothly as possible! The only scary part to me was that the water got too hot and was boiling over, but we fixed it. For me personally it was scary because I'm afraid of hot boiling water when it bubbles everywhere (long story!). In the end of it all, me and my partner were satisfied with the product made, and we couldn't wait till how it would turn out and crystallize the next day!